Using Python#
Introduction#
The platform provides the ability to use Python for various purposes, due to its convenience and wide adoption as a scripting and programming language. Python scripts on the platform must comply with version 3.0 as described in official Python documentation. The full Developer’s Guide is available in Python Developer’s Guide.
On the platform, Python is called Iron Python, which provides interoperability with C# code. It includes two main libraries - ‘clr’ and ‘system’, which provide access to the platform’s entities.
Python Library Menu#
In this menu, you can add common Python modules that become available on the front-end (in the Component Script) and back-end (in the Execute Script step for dataflow).
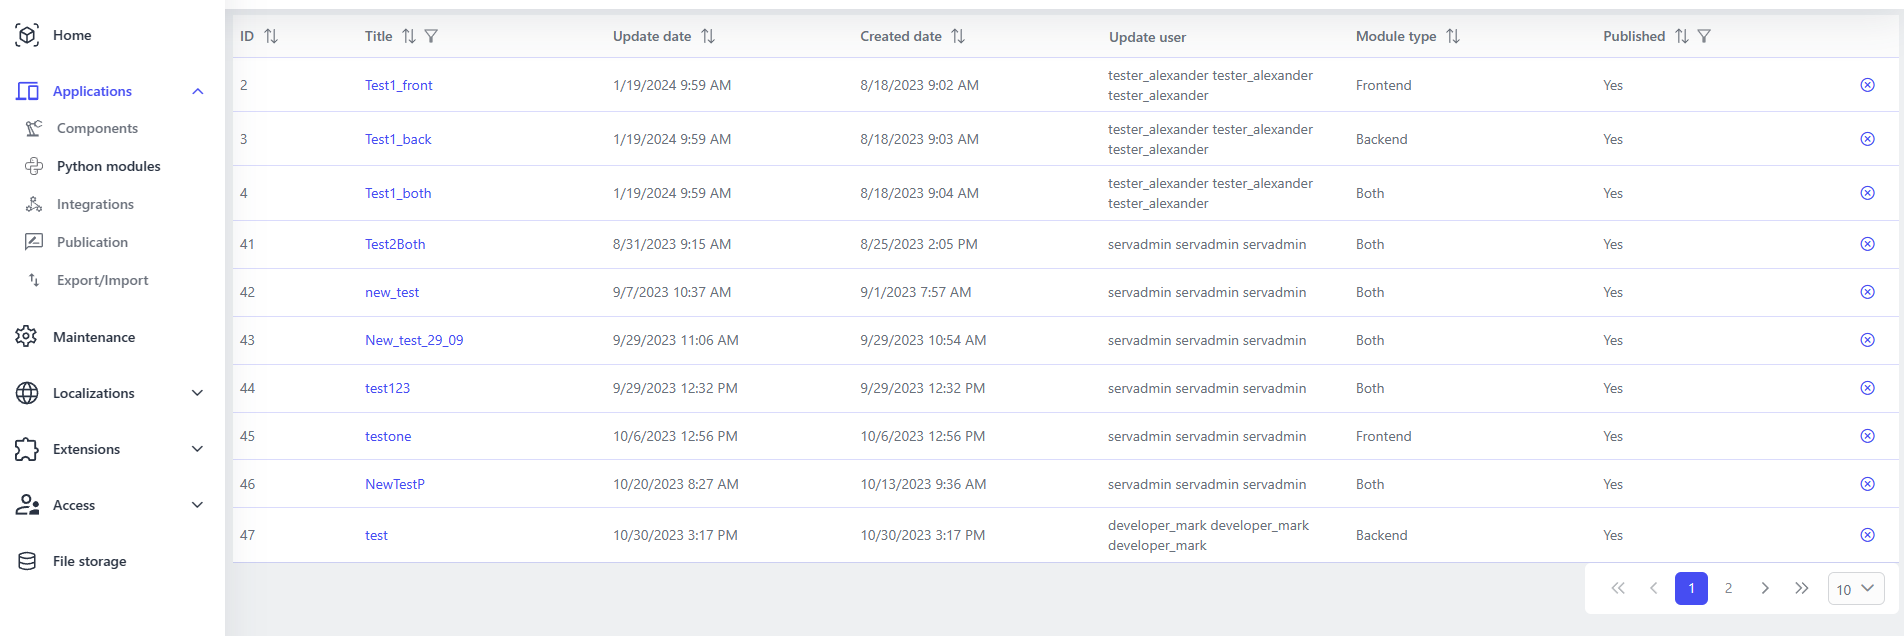
Viewing Common Python Modules#
The Python Modules Menu displays a list of modules that have already been added, including information about whether the module is available for front-end, back-end, or both.
Adding a New Module#
When you click on the Add button, the window for adding a new module opens.
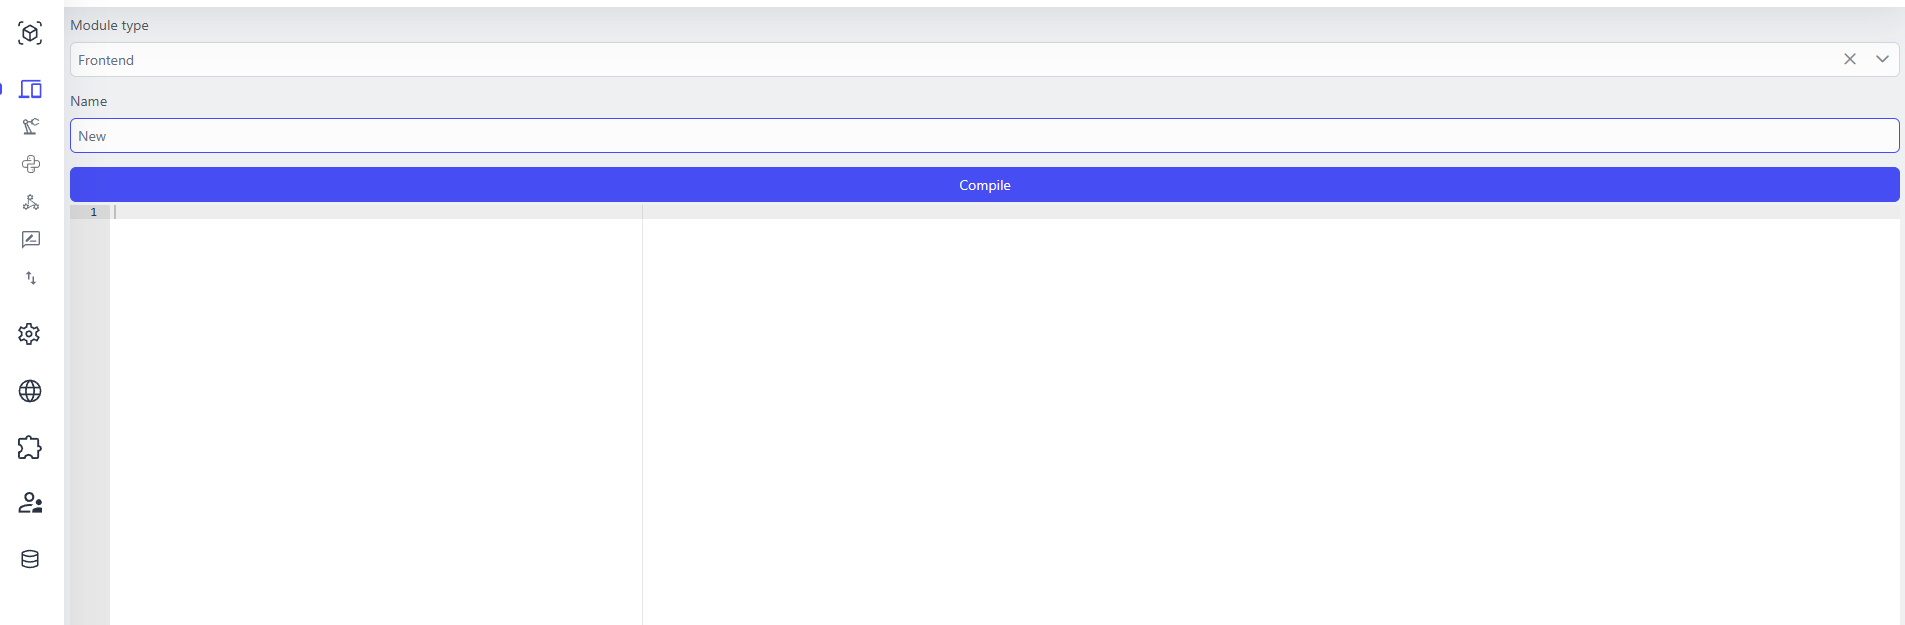
In this window, you can:
Select the availability type of the new module (front-end, back-end, or both).
Specify the name of the new module to import.
Insert and check the module code via “Compile”.
Platform and Python#
Python can be used as part of the Component Script for each component, allowing you to control the forms of applications, as well as part of the Dataflow via the Execute Script step.
Functions can be called in a variety of ways, such as one of the UI controls when certain events occur.
To access the components of the platform, you need to import the IronPython libraries (‘clr’ and ‘system’) and use the system variable ‘context’.
context.Model & context.DataModel#
context. Model& `context. DataModel’ provide access to various data fields in the Platform model.It is recommended to use ‘context. DataModel’ to access custom fields and ‘context. Model’ to access the component’s default internal fields.
context.Properties#
`context. Properties’ allows you to control UI controls, such as changing their visibility or availability. Example:
context.Properties.<Internal_UI_Control_Name>. =
context.Form#
`context. Form’ is used to access the form data or to control the visual representation of the form, such as configuring error messages. Available features:
`context. Form.Get(). SetValue()’ - Sets the value for a specific UI control in the current form.
`context. Form.Get(). AddError()’ - Sets the error message displayed below a specific UI control in the current form.
`context. Form.Get(). ClearError()’ - Clears the error message displayed under a specific UI control in the current form.
Example:
if datamodel.InvoiceName == 'PLEASE_SET_A_UNIQUE_NAME':
    context.Form.Get("InvoiceName").AddError("Please set a unique invoice name")
else:
    context.Form.Get("InvoiceName").ClearError()
context.Commands#
`context. Commands’ can be used to control the user interface of a currently executable component, change the content of the current form, open different pages, open new components, return to the previous page, or even launch new Workflows, Dataflows, or Scripts.
Examples of available functions of context.Commands:
`context. Commands.AddItem (GUID)’: Add a UI control to a page using a GUID.
`context. Commands.ChangePageAsync (GUID)’: Open the page using its GUID.
`context. Commands.ChangePageByName(“PageName”)’: Change the current component page to a new page using the internal name.
`context. Commands.OpenComponent (GUID ComponentID, GUID PageID)’: Open a new component and a specific page inside the component.
`context. Commands.EditItem (GUID UI_ControlID, EntityId)’: Shifts the focus of the UI to a specific UI control and specific data (using its internal ID).
`context. Commands.ExecuteWorkflow (GUID WorkflowID)’: Execute a workflow using its ID.
`context. Commands.ExecuteDataflow (GUID DataflowID, ContextID)’: Execute dataflow using its GUID and the specified data context.
`context. Commands.ExecuteScript (“ScriptName”, “ScriptParams”)’: Execute a script (function) from the Component Script with certain parameters.
context.Logger#
Functions from ‘context. Logger’ allow you to write information from the Component Script to the browser console.
The current version of ‘context. Logger’ includes the following methods, which differ in how the corresponding messages are displayed in the browser console (e.g. Info - black, Error - red, etc.):
‘context.Logger.Info(String)’: Writes an information message to the browser console.
`context. Logger.Error(String)’: Writes an error message to the browser console.
`context. Logger.Trace(String)’: Writes a trace message to the browser console.
`context. Logger.Error(Exception, String)’: Writes the error message and exception information to the browser console.
Example of a function from Component Script that outputs the string “Show model info” and the field value ‘Property_1’:
def show_model_info(model):
    context.Logger.Info("show_model_info")
    context.Logger.Info("Property Property_1=" + model.Data.Property_1)
context.PlatformServices#
Updated to version 0.7.0
The functions of ‘context. PlatformServices’ include a wide range of functions available on various platforms (web, mobile), as well as functions for building and displaying modal windows and sidebar windows.
The following methods are available as part of ‘context. PlatformServices`:
`context. PlatformServices.Device()’: Returns the device type (Browser, Android, iOS).
`context. PlatformServices.FingerpintAvailible()’: Returns ‘True’ if a fingerprint scanner is available.
`context. PlatformServices.EnableFingerpint()’: Enables the fingerprint scanner.
`context. PlatformServices.DisableFingerpint()’: Disables the fingerprint scanner.
`context. PlatformServices.FingerpintEnabled()’: Checks if the fingerprint scanner is enabled.
`context. PlatformServices.SetAppLock()’: Sets lock on the application.
`context. PlatformServices.ChangeAppPinLock()’: Sets PIN to lock on the application.
`context. PlatformServices.AppLockEnabled()’: Checks if lock is set on the application.
`context. PlatformServices.ScanBarcode(BarcodeType)’: Scans the barcode by the set type.
`context. PlatformServices.OpenUrl(“url”)’: Opens a new bookmark in the browser at the provided URL.
`context. PlatformServices.OpenFromBase64Url(url)’: Opens a new bookmark in the browser at the provided Base64 URL.
`context. PlatformServices.OpenApp(appUrl)’: Opens the application at the provided URL.
`context. PlatformServices.CanOpenApp(params string[] appUrls)’: Checks if the app can be opened on the device.
`context. PlatformServices.CanUsePayment()’: Checks payment possibilities.
`context. PlatformServices.StartPayment()’: Starts the payment process.
`context. PlatformServices.SMSRetriever()’: Allows you to receive SMS.
`context. PlatformServices.ShowDialog(string message, string title)’: Shows a simple dialog with an OK button.
`context. PlatformServices.ShowDialog(ComponentID, title, hSize, vSize, style)’: Shows a simple dialog on component ID with specified dimensions, title, and CSS styles.
`context. PlatformServices.Confirm(string message, string title = “”)’: Shows a dialog with Yes/No buttons.
`context. PlatformServices.GeolocationPosition()’: Returns the current geolocation.
An example of using ‘context. PlatformServices.GeolocationPosition`:
def Success(coords):
    context.Logger.Error("Get coords complete")
    if (coords == None):
        context.Logger.Error("Coords null")
        context.Logger.Error("Langitude " + "{:.2f}".format(coords.Latitude))
        context.Logger.Error("Longitude " + "{:.2f}".format(coords.Longitude))

def Error(exception):
    context.Logger.Error(exception, "Get coords error")

def GetCoords():
    context.PlatformServices.GeolocationPosition().Subscribe(lambda coords: Success(coords), lambda ex: Error(ex))
An example of using ‘context. PlatformServices.Confirm`:
def checkResponse(task):
    if (task.Result == True):
        context.Logger.Error("TRUE")
    else:
        context.Logger.Error("FALSE")

def show_modal():
    explicitSystemAction = System.ActionSystem.Threading.Tasks.Task[System.Boolean]
    result = context.PlatformServices.Confirm("Your Message", "Dialog Title").ContinueWith(explicitSystemAction)
The following group of functions is used to determine on which device and at what resolution the current user has the interface open:
`context. PlatformServices.IsDesktop()’: Returns ‘True’ if the interface is open on the desktop.
`context. PlatformServices.IsMobile()’: Returns ‘True’ if the interface is open on a mobile device.
`context. PlatformServices.IsExtraSmall()’: Returns ‘True’ if the interface is open on a screen smaller than 576px.
`context. PlatformServices.IsSmall()’: Returns ‘True’ if the interface is open on a screen larger than 576px.
`context. PlatformServices.IsMedium()’: Returns ‘True’ if the interface is open on a screen larger than 768px.
`context. PlatformServices.IsLarge()’: Returns ‘True’ if the interface is open on a screen larger than 992px.
`context. PlatformServices.IsExtraLarge()’: Returns ‘True’ if the interface is open on a screen larger than 1200px.
context.PlatformServices.DialogBuilder#
The functions of ‘context. PlatformServices.DialogBuilder’ are used to create modal windows that open on top of the current application window (form).
Example of a set of functions that create and display a modal window on top of the current window. It is important to change the ID of the component and the window (page) to be used:
def show_model_info(model):
    context.Logger.Info("show_model_info")
    context.Logger.Info("Property Property_1=" + model.Data.Property_1)

def open_custom_modal():
    # Creating a modal window template using the GUID of a specific component
    dialog_builder = context.PlatformServices.DialogBuilder('4b7675ae-406a-45bd-9bf9-526cc78ce476')
    # Setting the title for the modal window and selecting a specific page from the component's settings
    # Also setting the component instance ID to 1, so the first saved instance of component data will be used
    dialog_builder.WithEntryId(1).WithTitle("Open for test").WithPageId('8bd5310a-b7ff-4f65-bc38-3f4c20058483')
    # Setting the size of the modal window
    dialog_builder.WithVSize("480px").WithHSize("640px")
    # Adding a value for the Property_1, which should be in the used component
    dialog_builder.WithParameter("Property_1", "Incoming data for the property")
    # Configuring the callback function for the modal window's Ok button.
    # If the window is closed or the cancel button is pressed, nothing is called
    dialog_builder.OnComplete(lambda model: show_model_info(model))
    # Opening the created modal window
    dialog_builder.OpenDialog()
context.SessionManager#
`context. SessionManager’ can be used to retrieve data about a user’s token, as well as to make the user leave the session.
Available methods:
`context. SessionManager.GetAccessToken()’: Gets the current token.
`context. SessionManager.UpdateToken(token)’: Updates the token to a new one.
`context. SessionManager.LogOut()’: Ends the current session for the user (user logout).
context.Runtime#
`context. Runtime’ can be used to call JavaScript functions. Void can be used to call functions without a return value. Async can be used for asynchronous call.
Available methods:
`context. Runtime.Invoke()’: Calls the function.
`context. Runtime.InvokeVoid()’: Calls the function with no return value.
`context. Runtime.InvokeAsync()’: Calls the function asynchronously.
`context. Runtime.InvokeVoidAsync()’: Asynchronously calls a function with no return value.
context.UserInfo#
`context. UserInfo’ can be used to work with a user account.
Available methods:
`context. UserInfo.Identity()’: Retrieves information about the current user.
`context. UserInfo.Identities()’: Gets a list of all user IDs.
context.ConfirmationServices#
`context. ConfirmationServices’ can be used to open simple dialogs.
Available methods:
`context. ConfirmationServices.Confirm(message, header, icon)’: A simple confirmation dialog with a specified message, header, and icon.
`context. ConfirmationServices.ConfirmAsync(message, header, icon)’: A simple modeless confirmation dialog with a specified message, header, and icon.
`context. ConfirmationServices.StateTheReason(header)’: A simple dialog with a header and an OK button.
smth.Busy(boolean), smth.Error(boolean, string), smth.GetDynamicFilterValue(string)#
The ‘Busy(boolean)’ method sets the UIElement to the boot status, displays or removes the preloader. The ‘Error(boolean, string)’ method sets the UIElement to the error status and displays an error message. The ‘GetDynamicFilterValue(string)’ method calculates the Dynamic value of the filter. If there are two filters for the same field, the first one on the list will be calculated.
Examples:
def OnDataflowComplete(dataResult, dstList, srcList):
    srcList.Busy(False)
    dstList.Busy(False)
    '''Update lists'''
    srcList.Refresh()
    dstList.Refresh()

def OnDataflowError(exception, dstList, srcList):
    srcList.Error(True, "An error occurred")
    dstList.Error(True)
    context.Logger.Error(exception, "An error occurred during data-flow call")

def OnMove(dstList, srcList, dataObject, oldIdx, newIdx):
    context.Logger.Info("Callback on move")
    srcList.Busy(True)
    dstList.Busy(True)

    stage = dstList.GetDynamicFilterValue("data.Stage")

    '''Creating a model to call data-flow'''
    flowModel = { "Stage": stage, "OrderId": dataObject.Id }
    '''Calling data-flow with new onComplete and onError overrides'''
    context.ExecuteDataflow("783cf3e3-d8f8-4551-8447-13be4f738e41", flowModel,
    lambda res: OnDataflowComplete(res, dstList, srcList),
    lambda ex: OnDataflowError(ex, dstList, srcList))
Uploading images via http.client and file storage#
Only available in ‘Dataflow’ scripts:
import http.client
import file_storage

host = "docs.scalaxi.ru"
conn = http.client.HTTPSConnection(host)
conn.request("GET", "/ru/_images/main-dashboard-new.png", headers={"Host": host})
response = conn.getresponse()
'Пишем файл'
file_id = file_storage.upload_file(response.read(), "test_blob.dat")
item["uploaded_file@uuid"] = file_id

'Reading back'
data_bytes = file_storage.download_file(file_id)
SIP в Component Script#
Checking SIP availability: You can manage SIP availability by accessing the Enabled property.
    # SIP phone is available
context.PlatformServices.SipPhone.Enabled = True
    # SIP phone is unavailable
context.PlatformServices.SipPhone.Enabled = False
Reacting to call events: You can subscribe to various events such as outgoing call initiation, incoming call reception, call termination, and call answer.
context.PlatformServices.SipPhone.OutgoingCallCreated(lambda call_info: (
    # Processing of outgoing call creation event
))

context.PlatformServices.SipPhone.CallReceived(lambda call_info: (
    # Processing of incoming call reception event
))

context.PlatformServices.SipPhone.CallHangUp(lambda: (
    # Processing of call termination event
))

context.PlatformServices.SipPhone.CallAnswered(lambda: (
    # Processing of call answer event
))
Making and ending a call: You can make and end a call using the following methods:
    # Initiating a call using the entered number.
context.PlatformServices.SipPhone.Call(number)

    # Ending the current call.
context.PlatformServices.SipPhone.HangUp()
Creating a phone component: Additionally, you can create a component that will be displayed upon a call event within a small technical area.
phone_component_builder = context.PlatformServices.SipPhone.ShowComponent("phoneComponent")
You can read about its setup below.
Configuring component parameters and styles: These methods allow you to register parameters, page identifiers, and phone component styles, as well as record identifiers if needed:
WithParameter(key, value) - Description: Registers a component parameter;
WithPageId(pageId) - Description: Registers the component's page identifier;
WithEntryId(entryId) - Description: Registers the entry identifier;
WithStyle(style) - Description: Registers the component style;
DisplayValue() - Description: Used to retrieve call information, specifically, it outputs one of two fields:
DisplayName or FriendlyName, depending on which one is populated with data.
If both fields are populated, the method can return the value of either DisplayName or FriendlyName,
depending on the logic of your application;
Show() - Description: Displays the component;
CloseComponent() - Description: Used to close the component if there is a need to open a new one.
Requests to the catalogs service from data-flow script scenarios#
This code utilizes a Python module called catalogs. It executes an SQL query to fetch data from a table with the identifier "f28ff85c-ddad-4704-bb80-407bc45315ab". The query selects fields "Id", "Name", and "Data_Property_1", where the value of the "Name" field equals a specific value (in this case "test name"). The query result is stored in the variable query_result.
import catalogs

query = catalogs.query('select \
                        test_cmp."Id", \
                        test_cmp."Name", \
                        test_cmp."Data_Property_1", \
                        test_cmp."Data_Property_1" \
                        from "f28ff85c-ddad-4704-bb80-407bc45315ab" as test_cmp \
                        where test_cmp."Name" = @test_cmp_name')
query.add_parameter("@test_cmp_name", "test name")
item["query_result"] = query.execute()
Adding CRUD methods for data-flow script scenarios#
Adding CRUD methods for entity manipulation: This code utilizes the catalogs library, which provides methods for working with entity sets. First, an entity_set instance is created with the corresponding identifier. Then, operations for creating, updating, and deleting records are formed using the create(), update(), and delete() methods respectively. Corresponding properties are set for each operation, and corresponding commands are executed.
import catalogs
import json_extensions

# receive an entity set
entity_set = catalogs.entity_set("9f73ef4f-ebe4-44e5-a64d-5c8a1244be92")

# create a 'create' task
create_operation = entity_set.create()
# set the name
create_operation.set_name(json_extensions.select_token(item,"data.Property_For_Name"))
# write the property value
create_operation.data["Property_For_Name"] = json_extensions.select_token(item,"data.Property_For_Name")
# enable logging
create_operation.no_tracking()
# execute the command and obtain the record ID
entry_id = create_operation.apply()

# create an 'update' task
update_operation = entity_set.update(entry_id)
# enable logging
update_operation.no_tracking()
# set the name
update_operation.set_name("нове имя")
# write the property value
update_operation.data["Property_For_Name"] = "новое значений"
# execute the command
update_operation.apply()

# create a 'delete' task
delete_operation = entity_set.delete(entry_id)
# execute the command
delete_operation.apply()
Extension methods for working with JSON#
This code utilizes the json_extensions library, which provides methods for working with JSON data. For example, the select_token() and select_tokens() methods are used to select elements based on a specified path or query. The is_null() and is_undefined() methods are used to check if an element is of type Null or undefined respectively.
import json_extensions
# Get the item by path
json_extensions.select_token(item,"data.Property_For_Name")
# Select items by query
json_extensions.select_tokens(item,"data.Property_For_Name <> ''")
# Check the item type for Null
json_extensions.is_null(item)
# Check the item type for undefined
json_extensions.is_undefined(item)